Showing posts with label wall hanging. Show all posts

Wednesday, September 19, 2018

The digital seasons

I am happy!
Finally decided on binding of the wall hanging The Digital seasons.


The idea is to add small pieces of all fabrics I used as printing colors on the selvage.
The whole wall hanging is full of metaphoras - the fabrics I have chosen are connected with the colors of the seasons, the size of the blocks is different acording to my love to the seasons.
I love fall and hate winter.
Even the FMQ is corresponding to the seasons - wavy traces for the winter and blue water brooks for the spring.


I definatelly fall in love with these gravatars!


Monday, July 2, 2018

The Gravatar passion continues

One month!
I can not believe it has gone one month without posting here.
Uploading picture on Flickr seems to be an action from last century.
Instagram with device in a palm and fast comments pushed himself to the most usable media.
Anyway I will try to post once a month or often.

The gravatar passion continues. I have designed all the seasons and make them in a wall hanging.
Not finished yet but waiting for binding :)
After Summer gravatar I make the Spring.


Easy to sew you can make it different sizes.

Here comes the Autumn.

 The more complicated pieces are the central ones. The easiest way to stitch them is freezer paper.
Fast and accurate method when needed to sew many simple and repeated blocks.


I used hand dyed fabrics to sew all the gravatars.


Finished wall hanging will be in next post with the pattern of winter.

Sunday, December 3, 2017

The quilt - Hours before Christmas

Since my last post I was involved to create two quilts for Christmas.
Working on them was a real challenge for me.
Love the final result.


24 blocks as the days before Christmas, 12 clock faces as the hours of the day, 12 clock faces as the hours of the night. Each hour is so different.

After making the design I began follow the idea.
Collected  all white, green, red fabrics I have in my stash. Then added the gold printed ones.
I ordered them on the bed - almost 140. There are satin, taffeta, velvet, cotton fabrics.


First I began to make each block paper foundation. After sewing the second one I remembered about freezer paper. It was a perfect idea. - the work began going much easier.


Then I have made the second quilt.


 After sewing all the blocks I collected them and began thinking of quilting.

It has to be light and air.
I found a golden thread - perfect addition to the project.


The half of the blocks are with such star, the rest with different.


Final balance 22 white fabrics, 28 red and green, 2 golden - for the bindings.
I am satisfied.

Wednesday, September 30, 2015

Sound wave

What do you hang on the wall between two speakers? What will be the perfect picture?
I have to create a quilt for such place.
The idea is to show the sound wave between speakers.
And the most challenging decision is making it as a 3D quilt.
At the very beginning it was gathered strips only.


Then were plates and quilting.


And the final look comes.


The size is 40 x 26 inches.
Sold!

Thursday, September 24, 2015

The four seasons Wall hanging

 Two months ago I have a really interesting order to make a wall hanging that will match to the interior of a room. It was a real challenge because of mix of various materials and special spirit of the interior.
I decided on classical Black and White with fuchsia accent.
The four seasons always are good theme for improvisations so trees and fallen leaf are quite interesting directions to push my efforts.
In progress on my design wall:


I usually work with mini quilts or single blocks so my wall is narrow for entire top with boarders :)


For quilting I try the spiral for collecting all seasons and as reminiscence of tree annual rings.


I love using my walking foot. The quilting took me almost 2 hours - to short time for the quilt sized 33 inches square.
Are you interested in getting more fluent in using walking foot.
take the course at CRAFTSY Creative Quilting with Your Walking Foot


Saturday, April 5, 2014

Better later than never

I think I have the longest postponed project.
Two years ago I have finished this top.


I like it too much, but was a little bit bored with hand stitching.
The quilting has to be made by hand too, so I had put is aside for better days.

The truth is that if you have no desire for something it goes bad.
I wandered if it is wall hanging or lap quilt - size is 60 by 50 inches.
Put a thick batting and sandwich, but didn't like the hand stitching and ripped it.

Now I basted with a thin batting.
I have been quilting for one week and am happy with the design I have chosen.

Here is a small detail of it.


I intend to quilt the center of the flower with yellow thread following hexagon's sides.
But this will be the last action.

Now I am focused on finishing quilting with blue thread and binding.
It won't be finished for Palm Sunday, but for Easter...
At the worst till the end of month.

Happy weekend!

Saturday, January 25, 2014

Art wall hanging - The signs

If you are wandering where I have disappeared or visit here to read some news and had seen nothing it is time to see the truth.
I was not ill although flu and viruses around me.
I was busy. I had some urgent tasks.
I have to finish a wall hanging for a new modern  interior in a flat.
I was a special offer - it has to hang in front of dark red wall in a modern designed hall.


Here it is on the floor  ready for departure.


For the quilting I have used silk ombre grey white thread.
I want to add effect as it is sprayed. I used my walking foot for quilting.
Here are details.


In progress when I noticed the left down corner is too bold and added a black line.


The big challenge is to stretch on a frame.
The size is 36 x 40 inches. The side width of the frame is 1.2 inches.

I have written how to do easier.

Lay the finished quilt on the floor right side down.
Place the frame on it as shown at the diagram.
Cut squares at all corners as you make the bottom of a pouch. I left half inch seam allowances.
The bigger seam allowances lays better on the frame.


Pinch the corner right side inside and stitch. Repeat with all four corners.


"Dress" the frame with so prepared quilt.
Fold the upper side and tackthe quilt to the back side of the frame.

Slightly stretch the quilt and repeat with opposite side.
Then tack the next two opposite sides.
 Fold the corners as you wrap a parcel with paper.
Cut the exceed fabrics aligning the frame. I have stick with glue to prevent fraying.


Special thanks to my friend Mina from liza-myhobbies  who helped me with the idea for assembling.


Looking at it after finish it reminded me too much for signs left from vehicles.
So I named it THE SIGNS.

Wednesday, August 21, 2013

The broken window

Playing with some scraps I have created this crazy piece.
It has been laying among many orphan blocks till last week.
In my country we have an exhibition  content and I want to create a modern quilt to participate in.
The jury is very famous Fiber artist Caron Ann Waugh   and Madame Samm from Sew we quilt.
As a winner ofthe last contest - mini quilt Eco Patchwork I have to made something real stunning.
A very interesting idea came into my head.
I intend using this crazy piece as a corner or centre and adding more pieces to have an illusion of a broken window.
I love creating buildings and windows. Probably because I like interior design too much.
Piecing, adding, sewing, ironing, wandering and again.
I have use my new design wall. It is great to have one. Don't know why I haven't use till now.
Love the final result too much and took a picture in front of my window.

theBrokenWindow


The quilting turned out easier then I expect.
When quilted previous mini wall hanging I discovered that tiny pieces look better without quilting.
I mean smaller than one inch. Some of them are half inch in fact.


And leave the central part as it is.
Round it I stitch straight lines with walking foot and at upper site I have made an arc.
In binding added color stripes accent and here it is.


TheBrokenWindow

Waiting for the contest crossing finger!

Friday, August 16, 2013

New year wall hanging


I have started these project in 2012. Then added the number three for 2013.
And forget about it.
Now in hot summer I was asked by some quilters to update my pattern New Year wall hanging.
Is it time for New years preparations already?
In fact it is very easy and fast to update - I have sewn the number 4 only.

Now it is in my ETSY shop.
If you have CRAFTSY account only - visit here
If you have the pattern from last year - add only the missing numbers 4-9  from here.
You would use it till 2019 :)
Happy sewing and preparations.


Sunday, August 4, 2013

Le cheval rouge - The red horse art quilt

Some years ago I have visited n exhibition of student graduated the National art school. And I was impressed by a poster with the poem of Jacques Prevert. I have learned it by heart.


In the carousels of the lie
The red horse of your smile
Turns
And I am standing frozen there
With the sad whip of reality
And I have nothing to say
Your smile is as true
As my four truths.


As I have more self-reliance in my patchwork and quilt skills I decided to create this quilt.


I have no doubt about quilting. Straight lines for the spotlights and background.
Do you know how to make a move with the horse when playing chess?
This was decision for quilting the carousel (manege) .

Instead of simple label on the back I put printed text of the poem in three languages.


P.S. The size is 18 x 22 inches.

Friday, May 31, 2013

Picture wall hanging

My friends for Yorkshire arrived and I want to make something special for them.
Sometimes they stay here one month and I think they miss their native Yorkshire.
The Yorkshire dales - absolutely beautiful picture as I have seen some years ago and still remember.
I found an advertizing magazine with a amazing cover.
Gather some fabrics and began cut and build a picture.
I like these moments when looking for the proper color and shape.
Especially adore cutting and sewing wavy lines. I have found how to do this 3 years ago from Alicia Merrett tutorial.

I have began with the stone hedge, then grass, trees and follow the picture.
After some hours I have the following result.
You might ask for a picture with quilting?
I have finished but it is too late to take a good picture, so wait till tommorow.

Sunday, November 11, 2012

Let it snow outside! - tutorial

The winter will be here soon. It is going cold, the days are shorter.
First snowflakes will be dancing in the air.
Today this paper pieced snowflake has appeared in the fabric window.
Do you like it?
Go on with reading the post. I will show step by step how to sew this hanging.
Paperpiece half of the snowflake. You can find the pattern in my shops in Craftsy.
Note this is half of the pattern. The snowflake is still falling. And the project is easier and quick.
Cut two pieces with given dimensions an add a piece to each side as shown.

Cut a rectangle 7 x 11 inches and sew together.
Cut stripes 2 inch width and attach round the square.
Cut 14 inch square from back fabric and batting. Sew the top and back right side together as shown on the picture. Do not forget to leave 5" opening without seam for turning over.
Turn over, sew the opening blind stitch and iron.
Stitch a quarter inch from the edge and quilt as you desire.
I have chosen free motion quilting with white thread remembering snow.
Sewing hangings.
Cut two rectangles 6 x 3,5 " , fold each or them and stitch this way.
Turn over and iron. Make buttonholes and stitch to the back side of the quilt 1,5 " from the side edge.
 Sew the buttons and you are finished.
Let it snow!
You can use the same pattern for table runner or cushions.


Saturday, November 3, 2012

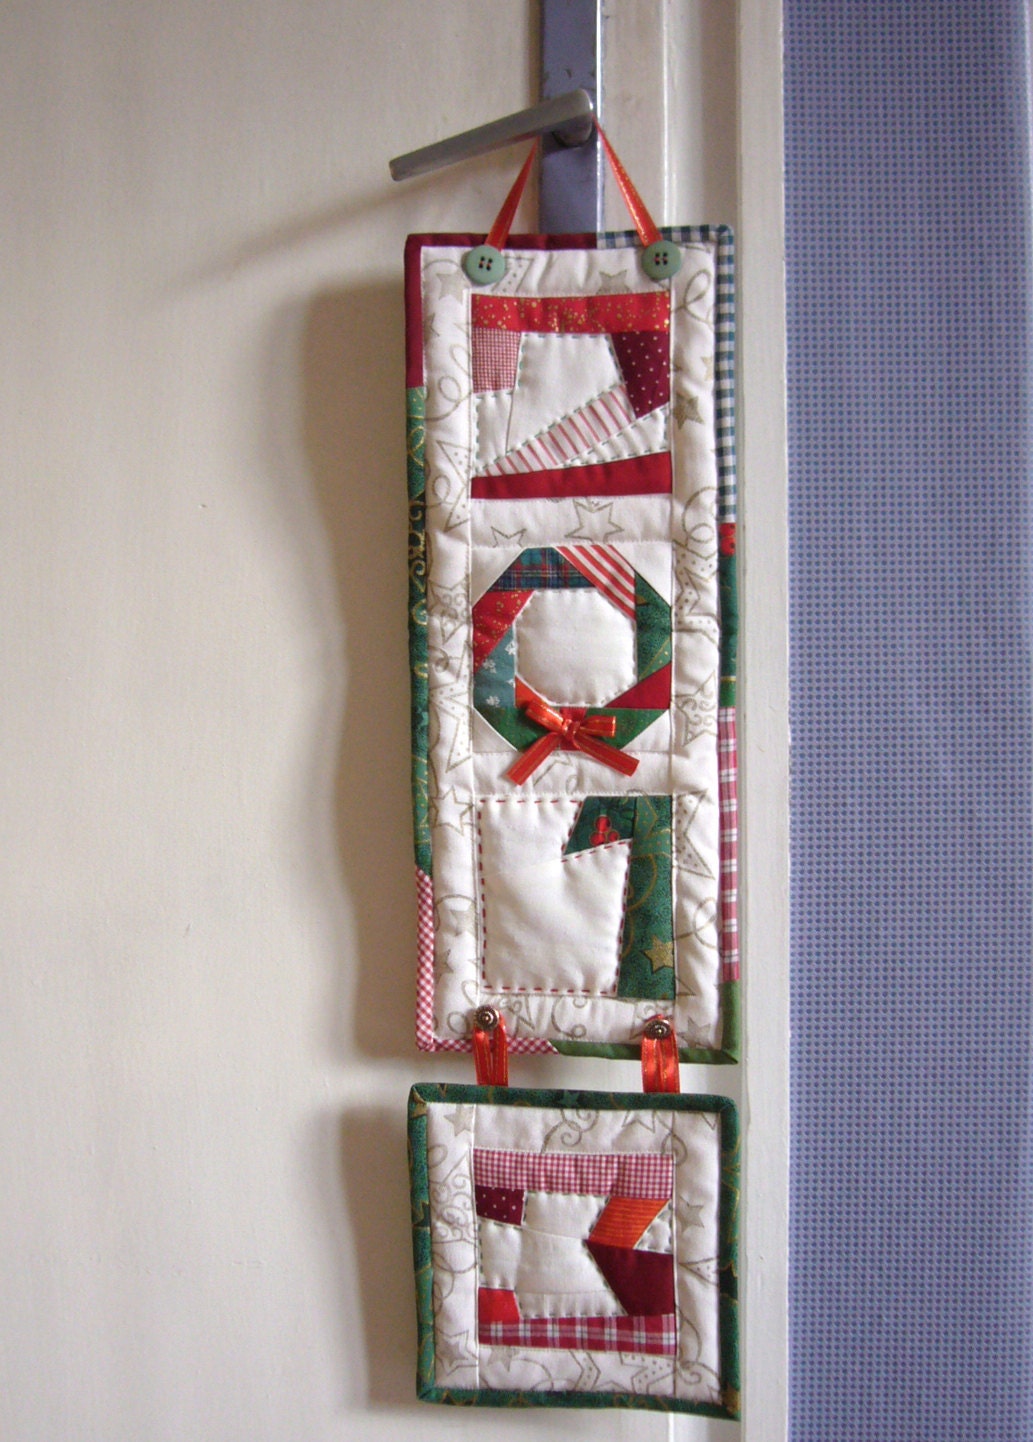
New Year wall hanging decoration Quilt


  New Year wallhanging decoration Quilt  paper pieced  PDF Pattern changing nimbers

 In time of crisis we should make adjustable works, so I designed this wall hanging such way.
The last piece is joined by buttons, so next year you would sew only the number 4 and hang again!
And then sew number 5 and so on.
Last year it looks this way.
Pattern available in my Craftsy.