Showing posts with label summer. Show all posts

Wednesday, September 19, 2018

The digital seasons

I am happy!
Finally decided on binding of the wall hanging The Digital seasons.


The idea is to add small pieces of all fabrics I used as printing colors on the selvage.
The whole wall hanging is full of metaphoras - the fabrics I have chosen are connected with the colors of the seasons, the size of the blocks is different acording to my love to the seasons.
I love fall and hate winter.
Even the FMQ is corresponding to the seasons - wavy traces for the winter and blue water brooks for the spring.


I definatelly fall in love with these gravatars!


Wednesday, May 30, 2018

Summer gravatar

I am hooked on designing gravatars. After spring pattern hot summer is coming
For this one I used hand dyed fabrics and batiks that remind me summer heat, summer colors. Pretty much satisfied with the result. As background I have used many pieces - different shades of white .


 If you are more confident with freezer paper don't hesitate to use it.
You will save time with no tearing off the paper.


Combine some different colors - you will have a sunny baby quilt.


Saturday, August 20, 2016

Summer tote at the seaside

I was given a big quantity of pieces leftovers from men's swimming shorts. They are colorful, amazing prints but strange shapes. Some of them are small narrow stripes, some has curved sides.
I have ordered on my table, dreamed a while and gather back in the box.
Three months or more I have no concrete idea.
One morning I got a pile of them. They are almost rectangle so I stitched two along the longest side.


I was not satisfied and insert a narrow blue stripe between.
 

What ate they use for?
Is it possible to make a tote?
Collect 4 of them, add thin batting and quilted. Trim to a square 15" (38 cm)


Attach a zipper pocket was very easy.
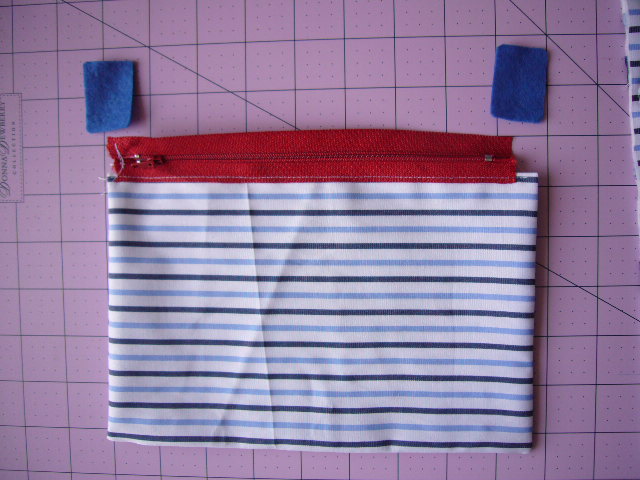
Cut two rectangles and stitch them like cushion leaving two inches opening and turn over.


 Stitch the first side of a zipper and prepare two felt pieces to cover both ends.


 Place on  the quilted back and stitch the pocket and the second (upper) side of the zipper.


 Attach the felt pieces.


The finished look.


Cut a stripe 45" long and 5" wide for side and bottom.
Place the stripe on the right side of the quilted square and stitch first side to a quarter inch to the edge and backstitch.
Forget to take a picture :)

Clip the stripe to make the corner and easy lay on the bottom side and stitch the same way.


Look how it looks on the front side


Repeat the same for the next side.
If you have exceed stripe trim it. It is better to have exceed fabric than run out.
Make the same steps with second quilted piece.
Now comes the lovely step for each quilter when the work is almost finished - the binding.
Yes, you heard properly. What does it mean to bind a tote?
If you have a serger one possible action is to sew and prevent fraying.
But binding the edges is more secure and the only possible variant without serger.
Use one inch stripe non folded.
Make as you usually make a quilt binding - the corners like the quilt's corners.


The second seam  - I don't care too much where goes the needle, but it is a good practice for the real quilt binding..


Make binding the same way at the upper side, too.
Now come the handles.
I found this beautiful synthetic rope.
Cut two pieces - 25 inches (64 cm) each and burned the ends by a lighter.
Stitch firmly on the tote and add buttons to hide the ends.


As a real summer tote I bring her at the seaside and took some pictures there.


Saturday, January 10, 2015

Summer breeze quilt

Sometimes our plans are far away from reality. Our desires and expectations looks like impossible dreams.
This quilt was began in September immediately I finished my short holiday trip to the seaside.
At the very first beginning I intend to make it using a paper pieced block. But looking through my stash I was "caught" by blue white striped fabric.
Cutting was so funny as a kids playing.
Start with two squares, cut diagonally, sew together, cut striped triangle and attach.Rotate, viola!
Finished block.


 If you wander how to optimize cutting when don't know the size and hate calculating simply follow this simple tip. Place the finished half block, align to the strips and cut.
No rotary cutting, just scissors.


I trimmed finished block to desired size later.
Thanks to my EQ7 I decided on 16 block top and mitered boarders.


The quilting should be light as the air at the sea side.
I made stitch in the ditch and diagonal quilting on white squares.
What about boarders?
I free motion a winding rope.

The last thing - binding. It took me 1 hour before I was advised by a friend for BIAS binding.


Look how nice it is.


The whole quilt


Last week I found time to write a pattern and now it is available on CRAFTSY and ETSY.

If you wandering what the back is. Here you are.


Want to paper piece the boat?
Simply draw this block on a paper and paper piece. It is mirror image =
I have put the numbers. You have to decide on the size only.


ENJOY!


Wednesday, August 1, 2012

Summer greeting card - on the beach

Hello 1 of August!
Time for sea and holiday.
Very easy project for greetings card.

You will need:
a piece of blue cardboard size A4 or letter(180 gr)
a piece of yellow paper (80 gr)
some fabric pieces
glue

1.Look at your scraps and choose some colorful pieces.
2.Iron and cut umrellas.
3.Set your machine stitch to max possible. When sewing a paper it is recommended to have long stitches to keep the paper.
4.Cut the yellow paper like sand beach and stick on the blue cardboard.
5.Fold the card.
6.Sew the fabric onto the cardboard like umbrella.
 You might sew different way depending on the shape of pieces.
6.Put some on the back, too.
7.You are finished.
Happy summer.