Monday, August 29, 2016

Featured and proud

What a week has began!
Last night I have seen that project "Where do you come you from"  where I participated in took part at the Festival of Quilts in Birmingham.
Visit the site Quilt-around-the-world  to read detailed steps of the project that took more than one year and has involved quilters from more than 83 countries.


Great news! I am happy and satisfied.

Friday, August 26, 2016

A tote with dual handles

As I mentioned in my previous post I have too much colorful pieces leftovers from men's swimming shorts.
Sewing another tote was very fast after having made a summer tote already.
But choose a proper color for the addition fabric was a funny task that took me more than one hour.
I have ordered on my table many combinations.


I have tried even checked fabric.


 Finally I decided on dark blue. I have followed all the steps except creating handles.

Here I made them using fabric loops and inserted the stripe into the loop.


Then stitched both ends together.


Such way you have a short handle (doubled) and a long one (single)

To fix them I have stitched velcro tape.


Saturday, August 20, 2016

Summer tote at the seaside

I was given a big quantity of pieces leftovers from men's swimming shorts. They are colorful, amazing prints but strange shapes. Some of them are small narrow stripes, some has curved sides.
I have ordered on my table, dreamed a while and gather back in the box.
Three months or more I have no concrete idea.
One morning I got a pile of them. They are almost rectangle so I stitched two along the longest side.


I was not satisfied and insert a narrow blue stripe between.
 

What ate they use for?
Is it possible to make a tote?
Collect 4 of them, add thin batting and quilted. Trim to a square 15" (38 cm)


Attach a zipper pocket was very easy.
Cut two rectangles and stitch them like cushion leaving two inches opening and turn over.


 Stitch the first side of a zipper and prepare two felt pieces to cover both ends.


 Place on  the quilted back and stitch the pocket and the second (upper) side of the zipper.


 Attach the felt pieces.


The finished look.


Cut a stripe 45" long and 5" wide for side and bottom.
Place the stripe on the right side of the quilted square and stitch first side to a quarter inch to the edge and backstitch.
Forget to take a picture :)

Clip the stripe to make the corner and easy lay on the bottom side and stitch the same way.


Look how it looks on the front side


Repeat the same for the next side.
If you have exceed stripe trim it. It is better to have exceed fabric than run out.
Make the same steps with second quilted piece.
Now comes the lovely step for each quilter when the work is almost finished - the binding.
Yes, you heard properly. What does it mean to bind a tote?
If you have a serger one possible action is to sew and prevent fraying.
But binding the edges is more secure and the only possible variant without serger.
Use one inch stripe non folded.
Make as you usually make a quilt binding - the corners like the quilt's corners.


The second seam  - I don't care too much where goes the needle, but it is a good practice for the real quilt binding..


Make binding the same way at the upper side, too.
Now come the handles.
I found this beautiful synthetic rope.
Cut two pieces - 25 inches (64 cm) each and burned the ends by a lighter.
Stitch firmly on the tote and add buttons to hide the ends.


As a real summer tote I bring her at the seaside and took some pictures there.


Wednesday, August 3, 2016

Sewing a Notebook

A friend of mine loves drawing so much that he draws everywhere when has even half hour. His drawing are amazing - look at them at his site.
I want to make a special gift for him so made a notebook. He likes quilting and patchwork so - the patched cover was the only possible decision.


I have so much fun sewing this sketchbook so want to make a tutorial if somebody want to give it a try.

Preparing the cover
I have white cardboards 6 x 12 inches, and decided to use them and made covers a little bit bigger than sheets.
Cut a piece of fused paper and order precut pieces to cover it.


Iron pieces to stick them on the paper and quilt as you desire.


Cut a piece of felt the same size as to patched cover is.
I want the plastic cover so Laminate 2 transparent  sheets and cut squares to put inside
Place the laminate squares (see the next photo) and draw a line round each of them. This mark will help you to gather easy to the patched cover. 


 Place a piece of fabric under the felt and stitch following the line.

  
Trim the fabric that exceed the felt.
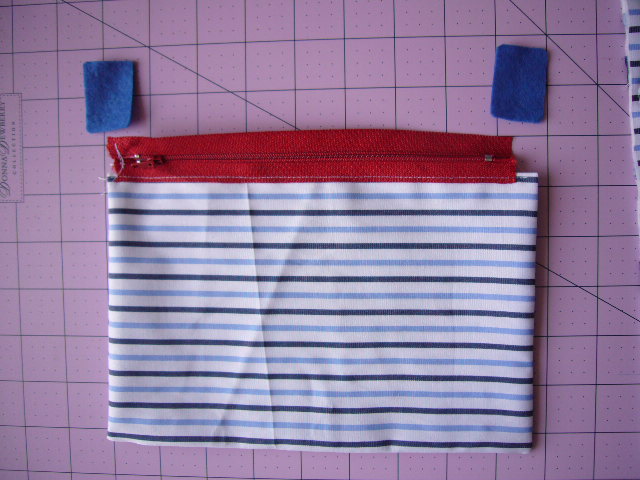
Put the patched top with the fabrics (face) down then this item with lining up, pin and gather them with a rechtangle stitching as shown on the next photo.


Now comes the tricky tip
 Place the laminated squares inside and fix them with small pieces of tape.
 Stitch together keep in mind to sew outside the seam that hold together felt an lining. 

 
See the upper cover's corner on the photo - there are two stitches side by side.


Till now I have the finished cover.
As I wrote at the beginning I have cardboard 6x12 inches an fold them in half and collect 3-4 sheets in a signature.I prepare 6 signatures.

Making the paper body
You will need a bradawl, a wooden corner and a piece of paper to mark the place where you have to make holes.

Mark the 4 holes - at about 2 inches one to another.Keep in mind to make marks symmetrycally.
Put this auxiliary paper inside each signature and make the 4 hols.


Use the same piece of paper folded to mark place for sewing on the cover.
Note that distance between two cover has to be divided on number of signatures - for me  they were 6.
1/8 inch (3 mm) is enough distance between two neighbouring marks.


The threads.
The thread should be strong enough when you pull out them. Perle cotton is a good idea - if you need colored thread.
The necessary length - measure the length of the cover's back and multiply numbers of signature plus one more length.
In my case - 6 inches x 6 signatures + 6 inches.
It is good to wax the thread before sewing.

Thread a needle, make a knot at 2 inches ftom the end and begin.


Keep loose thread to see the marks and at the last hole pull out and tighten the thread.
At the end of sewing first signature the needle should be outside the cover.


Repeat the same with the next one .


When finished this one you will meet the knot where the stitching began. make additional knot to secure the end of thread.

Go ahead with next 4 signature doing the same stitching.


Finishing
At the end - pin the needle back into the cover and signature. Make a loop.


Cut the ends.
You are finished with sewing and the back looks this way


 and the inside - 

I have added a bottom and a cord for closure.


Try to make one and show your finished notebooks.
Enjoy!